Easy home made ALMOND MILK (without all the nasty preservatives!)

If you’re like the majority of health conscious Americans out there, you’ve probably lessened up on the milk and opted for almond milk (or other variations) instead. Growing up, I never drank regular cows milk. My parents supplemented my cereals with rice milk and that stuff… sucked. It always tasted so watered down and lacked any flavor. I was excited when I first discovered almond milk and the whole new realm of this flavorful and substantial liquid. It wasn’t until the last few years in the midst of studying for my Nutritional Sciences degree that I decided to take a hard look at the premade Almond Milks that you buy from stores. I was surprised to find the the majority of almond milks have around 11 ingredients. I didn’t even understand half of the ingredients and I study food labels in school! This sort of freaked me out because I believe in eating food as close to it’s original form as possible. So I decided to make my own almond milk and was surprised to find how easy it was to make. The one catch is that it only lasts about 3 days. That really makes you think because store bought almond milk lasts up to two weeks in the fridge after it has been opened. Just how many preservatives are in those almond milks that it can last that long?? It’s worth trying. Plus it just tastes so much better when you make it yourself. Another positive: it makes you seem ultra impressive to your friends when it really didn’t take that much effort on your part.

20140808-162619-59179395.jpg

Homemade Almond Milk
makes 4 cups
what you’ll need
1 cup raw almonds
1 nut bag
1 mason jar
Water

1. In the mason jar, soak the almonds in two cups of water for 12-24 hours.
2. After soaking, drain and rinse the almonds. Put the almonds into a blender with 4 cups of water and blend for about 30 seconds.
3. Position the nut bag over the mason jar and pour the water almond mixture into the jar. You’ll have to do this in batches but it’ll go by quickly using the nut bag. Make sure to squeeze the bag with the almond meal in it to drain out any liquid. Do this until the all the liquid has been drained from the almonds.
**this will last for up to 3 days
Try adding some dates and vanilla extract to make it taste even better!

The best damn dinner salad ever.

Okay, I may be a little biased, but this salad is really good! Plus, it looks so fricken pretty as if it came directly out of a food photoshoot for Bon Appetit magazine! It’s a perfect picture of hearty avocado with crunchy seeds, light lettuce and other fruit and vegetable delicacies. Make it. Eat it. Love it. Definitely two thumbs up. Top it with some sun dried tomato hummus to really sass it up!

20140806-100445-36285487.jpg

The Best Damn Dinner Salad Ever
serves 1

Ingredients
2 cups mixed greens
1 small carrot
1 small beet
1/2 small cucumber
1/2 avocado
1 handful parsley
1 handful cherry tomatoes
1/4 cup chopped green onion
1/4 cup pumpkin seeds (pepitas)
1/4 cup roasted tomato hummus
1 tablespoon olive oil

1. In a large salad bowl, pour in the mixed greens.
2. With a zest-er or a grater, zest thin strips of both the carrot and beet. Add to the salad.
3. Cut the cucumber into thin slices and add to the salad.
4. Cut the stalks off of the parsley and add to the salad.
5. Cut the cherry tomatoes in half and add to the salad along with the green onions.
6. Slice the avocado and scoop out on top of the salad.
7. Heat a small pan to medium and add in the pumpkin seeds. Allow the seeds to slightly brown while constantly moving them around do that they don’t burn. This should only take about 30 seconds. Sprinkle the crunchy seeds on top if the salad.
8. For dressing, add the hummus to the top and drizzle the olive oil over the entire thing.

**This salad is extremely filling so you probably won’t need anything else for dinner when you make it! Enjoy!

Green Monster Quinoa Dish

I made this recipe one day when there wasn’t much left in my fridge and I felt like having a light and flavorful dinner. And thus, the GREEN MONSTER was born! I love pesto. Put pesto on anything and I will eat it. I usually make my own pesto and freeze it, but you can buy some pretty good pestos at the store too.

If you want to make your own pesto, just put 1 clove of garlic, 1/4 cup of pine nuts, 1 or 2 large handfuls of basil, 1/4 teaspoon of salt and 1/4 cup of olive oil into a food processor or blender for about 30 seconds or until all of the ingredients are well chopped up incorporated together. You can add more olive oil to thin it out if you want.

This Green Monster recipe is only 234 calories for one serving and if you love pesto as much as I do, then you will love this recipe! It’s sort of like a healthier, pesto flavored fried rice. You can eat this as a main meal or you can make it a side dish to another meal.

Plus, it just looks so pretty!

photo-55


Green Monster Quinoa Dish

234 calories per serving

serves 1

Ingredients:

1/4 cup uncooked quinoa

1 tablespoon pesto

1/4 cup frozen peas

1/4 cup chopped broccoli (into really small pieces)

2 green onions

1 tablespoons frozen corn

1/2 teaspoon olive oil

1/4 teaspoon salt


1. Put the quinoa into a pot and add 1/2 cup water. Cook on medium for about 15 minutes or until the quinoa is done.

2.Put the olive oil into a large pan and heat to medium.

3. Add the broccoli to the olive oil and cook for about 7 minutes, stirring occasionally.

4. Add the peas and corn to the broccoli and cook for another minute. Then turn off the heat and add the pesto and chopped green onions. Stir everything well to combine all of the flavors.

5. You can either put the quinoa down first and add the veggies or combine the veggies with the quinoa into a bowl.


I love this recipe! It’s great as a light dinner or lunch, but you can definitely add some tasty dishes to it to make a complete meal. One option might be to grill up some chicken and add it on top or cut up and put into the bowl with everything else!

Remember to take pictures of your results and tag me on Instagram (healthyfoodylifestyle) or Twitter (@AutumnBates21) so that I can see how yours turned out! 🙂


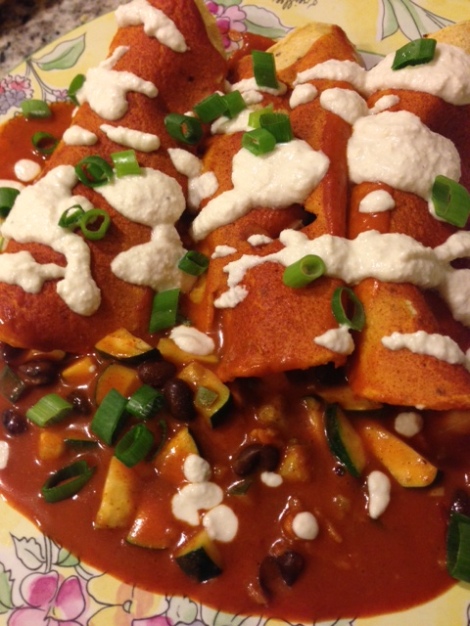
Black Bean Enchiladas with Cashew Cream topping

It definitely seems like I’m a vegan from all of the recipes that I’ve been posting… but I’m not! It just turns out that vegetarian/vegan food tastes so good and I’ve been extremely inspired to make veggie filled dishes lately! But since I have a plethora of vegetarian dishes accumulated in my recipe bank now, there’s no excuse to go meatless a few days of the week! 🙂

Here’s another tasty and healthy creation of mine. The cashew cream isn’t a requirement for this recipe. I just think it’s a great addition, but not necessary. If you do decide to make the cashew cream, it does take a full 24 hours to soak the cashews prior to making the cream, so make sure you plan ahead!

These black bean enchiladas are only 316 calories per serving (and you get two enchiladas per serving!!). If you choose to add the cashew cream, it’s an additional 126 calories per serving. These also taste great the next day! The flavors all meld together over night to create an almost completely different dish!

Taste bud approved and figure friendly 🙂


Image

Black Bean Enchiladas

serves 3

Ingredients

6 tortillas

1/2 cup cooked black beans

1 zucchini, cut into small pieces

1/4 cup onion, diced

1 teaspoon chili powder

1 teaspoon olive oil

2 cloves garlic, chopped

1 1/4 cup enchilada sauce

1/2 teaspoon salt


1. Preheat the oven to 375.

2. Pour the olive oil into a pan and turn the heat to medium high. Add the onions and garlic and cook for 3 minutes, stirring occasionally. Next, add the zucchini and chili powder and cook for an additional 7 minutes, stirring occasionally. After the 7 minutes, add the beans and cook for one more minute. Remove the pan from the heat once it is done cooking.

3. Pour about 1/2 cup enchilada sauce on the bottom of a baking dish. Fill a tortilla with about 2 tablespoons of the bean mixture. Fold both sides into each other to form a little tube and place the enchilada, seam side down, in the baking dish. Repeat for the remaining 5 tortillas.

4. Pour the remaining enchilada sauce over the enchiladas. Put in the oven and bake, uncovered, for 15-20 minutes.

5. (optional) Add the cashew cream on top of the enchiladas when you are ready to serve them.


Cashew Cream

serves 3

1/2 cup cashews

1 tablespoon lemon juice

1/2 teaspoon salt

1/4 cup water

1. Soak the cashews in water over night.

2. Drain the water from the cashews. Add the cashews, lemon juice, salt and water to a blender and blend until smooth.

Vegan, Gluten Free, Pesto Veggie Pizza

Sometimes, you just really need to eat a pizza. However, this doesn’t usually fit into your health goals. I decided to develop a healthy pizza recipe that is low in calories and high in nutrients. Plus, this pizza is ridiculously delicious, so you won’t even miss the junky stuff!

At only 254 calories per serving, this pizza will definitely help you maintain or achieve the figure that you want while still satisfying your hunger!

I paired this pizza with an enormous salad but you can also make a vegetable side dish of green beans, brussel sprouts, sugar snap peas, broccoli… whatever you feel like! That’s the great thing about eating a large amount of vegetables… you can eat SO MUCH FOOD!

If you try out this recipe (which you definitely should, because it’s amazing), take a picture of your end result and tag me on Instagram (healthyfoodylifestyle) or Twitter (@AutumnBates21) so that you can share your chef-ing abilities!

Happy cooking!

Image

Vegan, Gluten Free, Pesto Veggie Pizza

254 calories per serving

serves 2

Ingredients:

1 thin crust Udi’s Gluten Free Pizza Dough

1 tablespoon veganaise (vegan mayo)

1 teaspoon vegan pesto (or regular pesto if you don’t mind it not being vegan)

1 teaspoon olive oil

1/4 avocado

1/2 cup spinach

1/2 zucchini

3 crimini mushrooms

1/4 yellow or sweet onion

1 bell pepper

1 garlic clove

salt and pepper

1. Preheat the oven to 425.

2. Cut the zucchini, onion and bell pepper into thin slices. Lay the cut vegetables flat on a cookie sheet and pour 1/2 teaspoon over them. Add about 1/4 teaspoon salt and 1/4 teaspoon of pepper and toss it all together. Put in the oven for 8 minutes.

3. While the veggies cook, mix the 1 teaspoon pesto with the 1 tablespoon veganaise and set to the side. Slice the mushrooms into thin slices and set to the side.

4. Cut a garlic clove in half and rub the clove all over the pizza crust. Sprinkle the remaining 1/2 teaspoon olive oil over the crust.

5. When the veggies have finished cooking, take them out and lower the oven temperature to 375. Start assembling your pizza by first evenly pouring the spinach and mushrooms on the pizza. Then add the baked vegetables to the top. Put into the oven for an additional 7-9 minutes, depending on how crispy you like your pizza.

6. When the pizza is done cooking, take it out of the oven and add slices of avocado to the top. Then sprinkle the pesto mixture, using a fork, over the pizza. Slice into four pieces and serve!

Butternut Squash Black Bean Quesadillas… without cheese!

I know what you’re thinking… a quesadilla without cheese is just simply not a quesadilla! Well, you’re just going to have to try this one to believe me… you won’t even miss the cheese. I usually really don’t like the taste of butternut squash (it’s just too squashy tasting), but this recipe totally covers the flavor with spicy goodness while still getting the Vitamin A, E and minerals! I am literally addicted to this dish. 

Plus, something great about this recipe is that you can make the mixture for the quesadilla days in advance and have it in the fridge ready for whenever you feel like eating quesadillas! This recipe is tasty, nutritious, filling and figure friendly. Try it out and you will become a believer in the cheeseless quesadilla!!

Image

Butternut Squash Black Bean Quesadillas

300 calories per serving

serves 3

Ingredients:

1 small butternut squash (1-2 pounds) OR 2 cups (fresh or frozen) cubed butternut squash

1/4 yellow onion

1 cup canned spicy black beans (Whole Foods 365 brand is my favorite), drained of any liquid

1/4 cup Trader Joe’s Salsa Autentica 

2 tsp olive oil

6 corn tortillas

1 green onion for garnish

1 tablespoon of parsley for garnish

1 small avocado

1/2 lemon

a pinch of cayenne pepper

salt

1. Fill a pot halfway with water and put it on the stove at a medium high temperature. Pour the butternut squash cubes into the water and let it cook for about 20-25 minutes or until the cubes are tender when poked with a fork.

2. Drain all of the water and mash the squash cubes using a fork until there are no lumps. Put this into a bowl and set to the side.

3. Cut the onion into thin slices. Drizzle 1/2 a teaspoon of olive oil into a pan and turn the heat to medium. Put the onion slices into the pan and sprinkle about 1/8 of a teaspoon of salt over the onions. Let the onion cook for about 8-10 minutes, stirring occasionally.

4. While the onion cooks, add the salsa and beans to the squash and stir together. Add a pinch of cayenne if you like spicier food. The mixture will turn a little brown from the beans.

Image


This is the salsa I used and my quesadillas turned out so well! I strongly suggest using this salsa!

5. When the onions are done cooking, add them to the mixture and stir until combined. 

6. Add 1/2 teaspoon olive oil to a pan and turn to medium heat. Grab two corn tortillas and add 1/3 of the mixture to one tortilla, evenly distributing the mixture throughout the tortilla. Add the second tortilla to cover it and put into the pan. Cook each side for 4 minutes, making sure to flip the quesadilla after the first four minutes. Repeat this two more times for the other two quesadillas.

7. While the quesadillas cook, combine the lemon juice, 1/4 teaspoon salt, and the small avocado in a bowl and mash together. This is your easy guacamole to add to your quesadillas.

8. Once the quesadillas are done, slice them into 4 pieces, add the parsley, green onions and guacamole for a complete and DELICIOUS meal!

Vegan Sloppy Joes

I’ve actually never had sloppy joes before, but I found this recipe at http://www.foodnetwork.com/recipes/food-network-kitchens/spicy-vegan-sloppy-joes-recipe/index.html and it looked really different than what I normally make so I decided to try it out. The only difference in my recipe and the foodnetwork.com recipe is that I replaced the chile chili powder with regular chili powder and also added some cayenne and opted out of the bun (mostly because I was too cheap to buy a four pack of buns for one night). It was so good. I am definitely going out and buying some buns for tomorrow and making this one for my whole house (all meat loving boys) and I am positive that they will not be missing the meat.

Image

The recipe was so tasty, required such a small amount of ingredients and hardly any time to cook. I definitely recommend it to anyone who enjoys spicy food.

Plus, with such simple ingredients, it doesn’t break the bank.

Go check out the full recipe at http://www.foodnetwork.com/recipes/food-network-kitchens/spicy-vegan-sloppy-joes-recipe/index.html and give it a whirl!