Falling in love with fall… quinoa and pine nut stuffed acorn squash

Fall is by far my favorite season. A little biased? Maybe. But some of the tastiest and most complex food comes from this season. The squashes, root veggies and cruciferous plants!! All some of my faves. The common theme between all of these is that they taste absolutely incredible when roasted. Each different veggie has such a unique flavor that develops during the roasting process. Yams become sweeter, cauliflower becomes earthy-er and spaghetti squash becomes.. spaghetti (another post on that later this month)!

Roasting these veggies on their own is good… but stuffing them with some other awesome ingredients… even better!!

Acorn squash has a super ridiculously low glycemic load (4 on a scale that goes up to 250) which is good because it won’t give you high insulin spikes that cause a crash later on. It’s also known to be packed with magnesium, vitamin A, folate, vitamin B6, manganese, potassium and vitamin C. Plus, only 56 calories for a cup of the stuff.

Quinoa, as we know, is a complete protein which will help make you fuller faster.

This is a great side dish to meat, or a main meal if you pair it with some cooked veggies. Try it out!


photo 5-3


Baked quinoa and pine nut stuffed acorn squash

ingredients

1 small acorn squash
1 teaspoon olive oil
1 teaspoon salt
1/2 cup quinoa
2 tablespoons pine nuts
2 teaspoons butter
1/2 teaspoon garlic powder


1. Preheat the oven to 425 degrees.

2. Cut the acorn squash in half. Once you’ve cut it in half, take each part and cut about 1/2 inch off of the end so that it can stand up.

photo 2-9


3. Scoop the seeds out of the squash and drizzle the inside of both halves with olive oil. Then sprinkle 1/4 teaspoon salt into both halves as well. Put this into the oven for 25-35 minutes, depending on how big your squash is. Mine was really small so it only took 25 minutes.

4. While the squash cooks, put your quinoa into a pot with 1 cup water. Cover and turn the heat to medium high until it starts to boil. Once it starts boiling, reduce the heat to medium low and cook for 20 minutes.

5. When the quinoa is done cooking, sprinkle the garlic powder, remaining salt and butter into the pot with the heat off. Stir to combine.

6. Next, toast the pine nuts. Take a small, dry sauce pan and put it over medium high heat. Pour the pine nuts into the pan and constantly stir the nuts by shaking the pan. These burn VERY quickly so you can’t walk away from them. It should only take about 45 seconds to get properly toasted (if the pan is hot enough when you put them in).

photo 1-10

This is how the pine nuts will look when they are done.

photo 3-5

A shot of how the pine nuts and the acorn squash look when they are both done cooking.

7. Stir the toasted pine nuts into the quinoa.

8. Flip the acorn squash over so that the cut side is now facing up and put it onto your serving plate. Scoop the quinoa out of the pan and equally fill each half of the squash with the quinoa and you are ready to eat!

photo 4-4

**This also tastes great with some finely chopped and sauteed veggies mixed in with the quinoa, like broccoli, zucchini or cauliflower.

**Feel free to add a meat into the quinoa mixture as well. Just make sure it’s already cooked when you add it in and that it is chopped into small pieces!


The oh-so-Paleo butter in coffee thing. What, Why and how it tastes

My friend, Christine, actually was the first one to tell me about butter in coffee. We were laying out on the beach one day over the summer when she told me about it. It sounded so bizarre and disgusting that I disregarded it as a rumor and we went on with my day. It wasn’t until last week when I was reading The Skimm (awesome daily emails about world news) and it mentioned “bulletproof coffee” being a thing.

1 cup coffee+2 tablespoons (or more) grass-fed butter+1-2 tablespoons of coconut oil=Bulletproof Coffee (of course, blended up in a blender… or else it’s just a goopy mess of butter sitting on top of your coffee)

This drink is supposed to replace your breakfast… just saying.

After I saw it mentioned by a pretty reputable site, I looked more into it. I found a bunch of videos about how to make it and the benefits of it. I also found other websites saying it was a terrible idea and no one should be doing this. Basically, the whole idea behind it is to create a drink that contains the essential fatty acids your body needs from the grass-fed butter and coconut oil in order to have lasting energy as well as caffeine to give you a little boost without a crash. Here’s a little summary of both sides from my research:

The Butter Lovers Argument:

With “Bullet Proof Coffee” you’re using grass-fed butter which has the “best” ratio of omega 6 to omega 3 fatty acids. Having an optimal omega 6 to 3 ratio can decrease your risk of many lifestyle diseases such as cardiovascular disease. Butter also contains Butyrate, a short chain fatty acid, which used to be considered bad for you. Now, this fatty acid has been found to be anti-inflammatory and reduce your risk of CVD. Because of the addition of fats from the grass-fed butter and coconut oil, bullet proof coffee provides lasting energy (about 6 hours worth) without the crash often associated with regular coffee.

(If you want to read more about this argument, check out Women’s Health Magazine’s article on Bulletproof coffee)

The Anti-Greasy Coffee Proponents Argument:

Replacing your meal with this coffee means your missing out on a lot of essential nutrients. In fact, 1/3 of your essential nutrients if you’re used to eating 3 meals a day. You don’t get any fiber, only 1 gram of protein and the rest is fat. Yeah, eating this much fat will satiate you (it IS about 400 calories per cup of this stuff…), but it won’t satisfy your daily nutrient needs. Another point is that even though saturated fat has been found to not be linked with heart disease, it doesn’t mean you should be drinking a liquid concoction of it in place of your regular meal. No studies have been done on eating excessive amounts of saturated fat so no one really knows what could happen at such mega-doses. For example, just because you find out that broccoli decreases your risk of cancer, it doesn’t mean you should be consuming it for breakfast, lunch and dinner. The body requires many nutrients from a variety of foods and when you don’t supply it of that, you’ll find yourself in a diseased state.

(if you want to read more about this argument, check out Authority Nutrition’s article about Bulletproof Coffee)

coffee

After reading up about it, I had an idea of how I felt about the health benefits, but I wanted to taste it first before I set my mind to my opinion on the whole matter.

So I brewed up some organic coffee beans (freshly ground minutes before I made it), I pulled out my Vitamix and blended all that fat and coffee together. It looked just like a regular latte, minus the foamy top. Then the moment of truth came… and I tasted it.

At first, it didn’t taste that bad. It definitely was rich and “buttery”, but it mostly just tasted like coffee with excessive amounts of cream. But then I kept drinking it. My mouth had such a gross, coating all over it halfway through drinking the coffee that I couldn’t even finish it. I’m used to eating a higher fat diet with butter and coconut oil, but this was just too much. My stomach felt… icky. I mean, I did have energy but I also felt like I wanted to vomit.

I gave it a fair shot, but it wasn’t for me. Personally, I don’t believe that eating excessive amounts of anything in a normal diet is a good idea. I’ve learned way too much from all my nutrition research classes about how high amounts of almost anything, even the really “healthy” stuff, can cause your body to enter into a diseased state of some sort for me to believe that this drink is good for you. Your body needs a variety of nutrients in order to function and when you replace a healthy meal (not a bowl of coco puffs with milk… an actual healthy MEAL) with a drink that has only a few types of nutrients, your missing out on a lot. But who knows? Maybe if you make up for it throughout the day by eating really well all across the board, you’ll be fine. I personally would rather give myself a high fat, high protein smoothie with a clean latte. I mean, it doesn’t leave that coating inside your mouth and still gives you the high quality fat your body needs as well as that caffeine boost that you sometimes require.

IMG_6910

And it just looks prettier..but I might be biased 🙂

My dad creates recipes too: dads paleo granola

My dad rarely gets involved with the kitchen. If he does, he’s making crazy weird experimental smoothies that he thinks are delicious but the rest of my family semi gags over. But today, while visiting me at school for my last family weekend ever (side note-I graduate in December–yayayayay!!), he comes up with this little gem. I’m not a huge paleo advocate, but my dad really digs it. This recipe is uber paleo friendly and it’s really tasty too with minimal sugar. The only real sugar involved is in the dates. But you guys have got to try this one out.

IMG_6961.JPG

I don’t know if you guys have heard of the whole butter in coffee thing… but I think it’s strange. It just sounds unappetizing. Paleo peeps love their butter, so this recipe has a little butter involved. Not as much as my dad wanted, but I made him compromise with me over the amount.
This recipe is great for a little pick me up to help hold you over between meals. Packed with healthy fats and protein! And make sure to use grass fed organic butter- we don’t want any nasty hormones in our recipe!

IMG_6966.JPG

Dads paleo granola
ingredients
1/2 cup almond butter
3 tablespoons butter (weird, I know)
1/4 cup coconut oil
2 tablespoons of the following:
-macadamia nuts
-walnuts
-pumpkin seeds
-pecans
-pistachios
-cacao nibs
1/2 cup coconut flakes
5 dates, pitted and chopped
1 tablespoon cinnamon
A pinch of salt

1. Finely chop the nuts and seeds.
2. Combine EVERYTHING into a large mixing bowl.
3. Cover a pie pan with parchment paper and pour the mixture into the pan.
4. Put into the freezer for at least an hour then transfer to the fridge and enjoy!!

“Clean” iced vanilla latte sweetened with dates

I get by with a little help from my French press….

I’m in my last semester of college and I definitely rely on coffee to get me through those tough days and nights of studying and writing papers. It’s just a necessary evil sometimes. When I was a freshman in college, I had a friend who was 24 years old and he was coming back to school to get a second degree. We were both in science major classes that had three hour labs twice a week and tests that averaged out at 55%. I was struggling with my transition from high school studying to college binge studying and he was my study partner. I didn’t really drink coffee then but he was addicted and always had an ice coffee whenever I saw him. One day, he came to study with and had brought me an iced vanilla latte. I wanted to seem cool and pretend that I drank coffee all the time, so I downed it. All of the sudden, my mind was focused, my heart was racing and my head was determined to memorize the genus, class and species of every damn animal that we needed to know for our animal bio class. Needless to say, I got hooked on the beneficial effects on productivity that coffee provided me. I spent my first three years of college guzzling down pumpkin spice, vanilla and hazelnut lattes. All that junky crap that you’re not supposed to have on the daily because of the added sugar and processed carbohydrates.

Now that I’m much more health conscious but still in need for that caffeine boost, I’ve started making my occasional habit a little healthier. And I introduce to you the clean iced vanilla latte!!

IMG_6910.JPG

clean iced vanilla latte
ingredients
1 cup black coffee (preferable from freshly ground and organic beans)
1/4 cup unsweetened vanilla almond milk (or less if you like your coffee stronger)
2 dates, pitted
Ice optional

1. Combine all of the ingredients other than the ice in a blender and blend for about 30 seconds.
2. Pour over ice in a cup and enjoy!! If you prefer it sweeter, just add more dates to the mixture.

**you can also blend in cinnamon or pumpkin pie spices for a little extra kick! Enjoy!

Quinoa for breakfast?!?!

When I was at the Tone It Up Retreat last week, I ate a lot of quinoa. I mean a LOT of quinoa. I’ve always been a fan of quinoa because it’s a complete protein and a good grain alternative (because it’s actually a seed, not a grain). I have quite a few recipes on my blog already that use quinoa as a staple but I’ve never really used quinoa for breakfast before until this morning.

Well, actually, technically I tried it for the first time at the retreat. I was definitely skeptical when I saw “oatmeal” made of quinoa. It seemed like an odd pairing, quinoa and breakfast. But I gave it a whirl and I’m glad I did! Having quinoa for breakfast really helps fill you up and keep you satisfied throughout the day (probably because it’s high in protein). Plus, it doesn’t really taste like anything, so it’s extremely versatile and you can add whatever you want to it.

I pre-made the quinoa last night so that it wouldn’t take as long to prepare. I suggest everyone do it that way too since most people don’t have ample time in the morning to leisurely cook quinoa for breakfast.

Try it out and let me know how you like it!

**OH and by the way… along with this quinoa oatmeal dish this morning, I made a “clean” latte. And holy mother of all delicious food… it was incredible. Don’t you worry though, I’ll be posting THAT recipe soon enough!**

Don’t forget to follow me on instagram at @healthyfoodylifestyle for more recipes, fitness and health updates. And be sure to post your creation and tag me in it so that I can see how yours turned out!

So what are you waiting for… go eat some quinoa for breakfast!

photo 1-9

Superfoods and Strawberries Quinoa Oatmeal

serves 3

Ingredients:

1 cup uncooked quinoa

1.5 cups almond milk

1 teaspoon cinnamon

1/2 cup chopped strawberries

3 tablespoons cacao nibs

3 tablespoons goji berries

3 teaspoons honey

1. Pour the quinoa, almond milk and cinnamon into a pan. Raise the heat to medium high until it starts to boil, then reduce the heat to medium low and cover. Let this cook for 20 minutes. If the quinoa dries up before it is cooked all the way through, just add 1/4 cup more almond milk to moisten it again.

*This step can be done the night before. Once the quinoa is cooked, just wait for it to cool off and put it into tupperware and into the fridge. When you are ready to reheat it, take out the desired amount, put it into a pot, add 1/4 cup almond milk and put it over medium low heat while you prepare the other ingredients*

2. Separate the quinoa out into three bowls. Sprinkle the strawberries, goji berries, cacao, and honey on top of each bowl. Serve hot!

1/2 Marathon/Full Marathon Tips: basically… don’t do what I did the first time

asicslamarathonlogovertical

The Asics LA Marathon registration opened this week so I thought it would be appropriate to give all you first time-marathoners some tips on how to prepare for one of the most mentally and physically challenging days of your life.

Before I give you the life-saving tips that you absolutely MUST listen to… let me tell you a little story about my first time training for the LA marathon…

It all started almost exactly two years ago when one day I was watching a movie and for some reason the thought popped into my head that I wanted to do the marathon. This may or may not be how most of you decided to run your first marathon, but I digress…

So up to this point I had done countless 5ks and sprint triathlons. I hadn’t really ever done long distance running but for some reason in that moment watching “Shawn of the Dead” I decided that running a marathon might or might not change my life.

With only a max of 8 miles under my belt as of that moment, I signed up for the LA marathon and started doing research on exactly how to go about this thing. I also signed up for a 1/2 marathon in my hometown at the same time that was the day after Christmas. I read three books, followed around 12 blogs about running and subscribed to runners world magazine. I knew pretty much all you could possibly know about running a marathon-in theory. I also worked my butt off during my 6 months of training. I never missed a single long run and I stuck to the schedule that I had laid out for myself. I even completely changed my diet to adhere to a more long distance running friendly workout schedule. I was 100% committed.

Then the first 1/2 marathon rolled around. I had done about 16 miles up to this point so I knew that I could do the 1/2 no problem. The race took place about 4 miles away from my house, so the morning of the race I got up at 5 am and did exactly what any other sane person wouldn’t do–I rode my bike with my parents to the race before running 13.1 miles. THANKFULLY the ride was mostly downhill so it didn’t tire me out before I had to run. I was so excited for my first long distance race and to put my training to the test.

148618_499557630089409_311292307_n

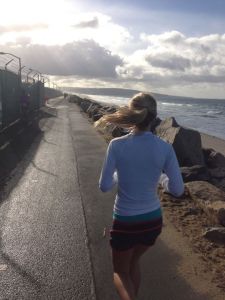
(The final 5k stretch of the half marathon. It was a really small race with only a couple hundred people, but you can’t beat that scenery!)

I ended up doing better than I expected on this race! I finished with a time of 2:01 (which isn’t remarkable, but I’m not a fast runner so I was proud). The one bad thing about this amazing race… it put my expectations up way too high for the marathon. And you’ll read this all over the internet when searching for tips on marathon training– run slower than you think you can; just focus on finishing for your first race; it’s a marathon not a sprint. And yet for some reason, we all seem to think that we’re different and that the advice doesn’t pertain to us. It does. It always does. Really. Trust me. Don’t make the mistake that I did.

So… what was my mistake?

I got cocky. The week before the marathon, I dropped my nutrition plan that I had been adhering to for the past 6 months and instead ate way more protein and way less carbs. Stupid. Stupid. Stupid. They call the week before the big race the “carbo loading” week for a reason. So yeah, that was stupid mistake number 1.

482322_540811252630713_1813169042_n

(At the LA marathon expo to get my number for the race. That’s my dad with me too. He’s a ridiculously proud dad and I love him! Quick side story- my dad flew out to Tucson-where I go to school- to be with me during my longest long run before the race. He biked 20 miles with me while I ran to keep my company. He’s amazing.)

Anyway, the night before the race, instead of eating my typical meal of sweet potatoes, tons of veggies and quinoa, I ate at a brand new restaurant that I had never eaten at before. Mistake number 2. Why is that a mistake you ask? Well the portions were tiny. And I was about to run 26.2 miles the next day… while burning about 2600 calories during one workout. I needed big portions. I also have a pretty sensitive stomach when it comes to being nervous. I can’t eat when I’m nervous. At all. So needless to say, the next morning at 3:30am when I woke up for the race, I was nervous and bailed on my normal breakfast. I was scared that I would throw up or something because my stomach was so upset. Mistake number 3. ALWAYS EAT BEFORE YOU RUN 26.2 MILES!!! Now that’s just common sense.

9100_545257832186055_1030738867_n

(Me at the very start of the race. Just before everything went to sh*t)

Mistake number 5: Obviously I knew that not eating before this huge workout was a bad idea. So at the start of the race, I tried to force some bagels and bananas that they had available for us down my throat. I don’t eat bagels. I haven’t eaten a bagel in years. And yet I ate one before the biggest workout of my life. Don’t do that. DON’T CHANGE YOUR DIET AT ALL RIGHT BEFORE THE RACE!!

So that was dumb.

You might be asking, what other POSSIBLE mistakes could you have made?

Well, you know those GUs that long distance runners are supposed to eat in order to give them glucose to refill their glycogen stores? I made my own because I didn’t like all the junk that was in the premade ones. That isn’t the bad idea part. The bad idea is that I had never practiced holding onto them while running to make sure nothing bad could happen. Well it turns out something bad can happen. All of my GUs that I had prepared exploded in my little runners belt. I was running on almost no food other than a few bites of bagel before a 26.2 mile run. You know those days when you try to run and it feels like your legs are made of lead and you can barely get them to leave the ground? That’s what I felt like for 26.2 miles. I had been expecting to finish with a time of around 4 hours and 20 minutes (because of my first time during the half). I ended up finishing at 5 hours and 11 minutes. I have never experienced such agonizing pain in my life. I was running so slow that even this little man wearing mini shorts and power-walking was beating me! I’m still so amazed that I was even able to finish in the first place. As soon as I stopped running after I crossed the finish line, it felt like tiny daggers were piercing each and every section of my legs. The full WEEK I could barely walk. The part that’s absolutely absurd is that when I did my 20 mile run, I felt great! That means I could’ve had a way more incredible experience my first time if I had just followed a few SIMPLE tips…

577846_10151284251366012_321820632_n

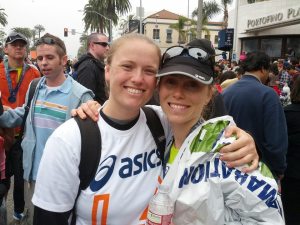
(Right after I finished the race. You might be able to tell that my nose and eyes are red from trying to hold back tears of absolute pain)

PLEASE FOLLOW THESE TIPS IF YOU PLAN ON RUNNING A MARATHON!!!

1. Don’t change your diet!!

Once you’ve found a way of eating that works with your body and allows you to do long runs with full energy, DON’T SWITCH IT UP!!! Trust me. You don’t want tiny daggers piercing your leg muscles from a lack of glycogen stores.

2. Practice eating and running with your GUs during the long runs.

You really don’t want to have any explosion issues like I did. The race does provide you with GUs, but not until mile 20 or 21, so trust me, you’ll want your own.

3. You’re running a MARATHON. Not a sprint.

Even if you felt great during your 20 mile practice run and you think you can push yourself, just don’t do it. Running 26.2 miles is pushing yourself. At least for the first one, run waaaaay slower than you think you can run. You’re legs will thank you at the end. Nobody really cares what your time is anyway. When you say you ran a marathon, people are already amazed at that ridiculous accomplishment.

4. Even if you don’t feel like eating the night before or the morning of… EAT.

You read my horror story of not eating. Don’t let that be you. It’s terrible and I wouldn’t wish it on anyone.

5. You’re running a marathon… have some fun!

The ONLY reason I was able to complete my marathon is because I had family members riding their bikes next to me while I was running to keep me going. That, and I ran with “Marathon Man” (if you don’t know who he is, look him up. He’s one amazing man.) for about 3 miles and he really pushed me to keep going even though I wanted to just lay down on the ground and melt away. Talk to other people around you. Everyone is excited to be running the race and most people are doing it on their own, so find someone to be your race buddy. The miles go by a lot faster when you have someone distracting you.

Running the LA marathon was one of the most physically and mentally challenging experiences of my life. I didn’t expect myself to get emotional when I crossed the finish line, but as I rounded the corner for the last 1/4 mile stretch and saw that the end was in sight, I broke down and cried the rest of the way. I was crying because I was in pain, yeah, but mostly I was crying because my six months of dedication and training had paid off. I was about to cross the finish line and be a “marathoner”. I did it and no one could ever take that away from me. To all of you who are starting your months of grueling training know this: It’s all so worth it.

Workout Wednesday: ladies, stop fearing the weight room!!

IMG_6636.JPG

I know that really big buff guys with their equally enormous weights can be really intimidating. So intimidating, in fact, that it causes you to avoid the weight room all together and modify your workout to use lesser amounts of weights that can be found in the “stretching” area. But it’s time to overcome this fear. In order to get an awesome and diverse workout, you’ve got to start hitting up that heavy weight area.

NOTE: lifting weights or doing exercises with weights will NOT make you big and bulky. That seems to be every woman’s number 1 fear but it will just make you more defined. Women don’t have the testosterone to build up muscle the way men do. Also, you would have to be lifting REALLY heavy weight to see results even close to that. So don’t be afraid of the bulk. It won’t happen.

Anyway, yes I realize the weight room is intimidating. I go to University of Arizona and we were just rated the number 1 campus recreation in the nation. Aaaaand cue all the really large meat heads and weight lifters… So trust me, I know it’s intimidating. But once you get over that fear, it’s a piece of cake and you see that most of those “meat heads” are large freshmen who don’t really even know what they’re doing anyway.

IMG_6637.JPG

I recommend starting off with the smith machine. It’s a guided bar that allows you to do squats with the extra weight and form but without the instability of a free bar. It’s a good first step. It looks like the picture above (with me performing a squat on it). I would recommend adding ten pounds to each side first and then do one set of ten reps of squats. If you feel like you can, add five more to each side and do two more sets.

IMG_6640.JPG

The benefits of the extra weight of the squat rack are immense. It’s a totally different workout and you’ll start feeling yourself getting more toned, faster!

Don’t be afraid. If you need support, take a guy friend and have him show you how it works. Go during a time when it isn’t busy and that’ll help your nerves also. Maybe go when your school has chapter for the Greek life because that seems to eliminate a lot of the surrounding gym go-ers.

Good luck and have a happy workout Wednesday!

Trying something new: Celery Root Fries

Every seen Harry Potter? Do you remember the Mandrake Root? The little plant that when you pulled out of the ground it would scream its head off? Well, celery root almost looks like that. Just in the fact that they both look so gnarly and inedible. It doesn’t scream when pulled out of the ground though, so no need to worry.
Celery root is actually very edible and rather tasty. Plus, with fall approaching, it’ll be in season so you’ll be seeing a lot of it at your grocery store. The first time I cooked with celery root was three years ago when I lived in Santa Barbara with a house full of five other girls. I don’t remember how I came across it or even how I knew what to do with it, but I do remember my roommates acting very intrigued.

“You’re going to EAT that thing?!”

photo 5

They all sat around and watched while I removed the outer layer and started slicing the root into fry sizes. Once I had finished cooking them, the little fries were unrecognizable from the original form it took. I offered my roommates to try some. Needless to say, they were a little wary to try it after seeing the original gnarly, root-y shape, but once they got up the courage to try it, they ended up taking seconds, thirds, and fourths!

Try something new this fall and buy a celery root! I swear, it’s waaaay tastier than it looks!

Celery Root Fries

serves 1

Ingredients:

1 celery root (you lose a lot while trimming off the outer edges, so try and get a larger one)

2 teaspoons olive oil

1/2 teaspoon salt

1/2 teaspoon chili powder

1/8 teaspoon cayenne (optional–for those who like a little spice in their life)

1. Preheat the oven to 375 degrees.

2. Cut the top of the celery root off. This will be used as your starting point for cutting off the outer edges.

photo 4

3. Using a sharp knife, slice off the fibrous-y outer layer until it resembles a peeled potato.

4. Cut the root into thin, french fry shaped strips and put onto a cookie sheet. Add the remaining ingredients and toss until each fry is coated.

photo 3

5. Put in the oven for about 25 minutes or until its reached your desired crispiness. Serve with a chicken burger or maybe even a steak! I paired mine with a nice big steak and some green beans 🙂

photo 1-5

Sassy, Slimming Zucchini Avocado Tacos

There are only two weeks or so left of summer (even though it doesn’t feel like it because I’m back in school for my last semester), so it’s time to take advantage of green vegetables and taco season.

These tacos are under 200 calories each but they still satisfy your taco craving. People always ask me if I’m a vegan/vegetarian because the recipes that I post mostly contain veggies. To answer those people’s question: no, I’m not a vegan/vegetarian. I just like to eat a lot of food. I LOVE vegetables because you can flavor them any way you like but they are so low in calories that you’re forced to eat more! I like to eat. I also don’t want to be enormous. Eating flavorful vegetables is my solution! And trust me, you won’t miss meat in this recipe. You won’t feel icky and full after this. You’ll feel so refreshed and happy that you could stuff your face without feeling guilty! 

So eat up! Only a few more weeks of green veggie and taco season!

IMG_3151


Sassy, slimming avocado and zucchini tacos

makes about 6 tacos, serves 2

Ingredients:

6 corn tortillas

1/4 cup fresh or frozen corn

1/4 cup fresh or frozen peas

1/2 cup sliced red onions

1/2 avocado, sliced into 6 pieces

1 handful of cilantro

1 tablespoon and 1 tsp olive oil, separated

1/2 tsp salt

1 tablespoon dijon mustard

1 teaspoon lemon juice

1 garlic clove, minced


1. In a skillet, pour 1 tsp olive oil and heat to medium. Add the onion and saute for 4 minutes. Add the zucchini and salt and saute for another 5 minutes. Lastly, add the peas and corn and saute for another minute. Turn the heat off.

2. Combine the tablespoon of olive oil, dijon mustard, lemon juice, and garlic clove in a food processor until smooth.

3. Warm the tortillas on a dry skillet by quickly moving the tortillas around while the pan is on medium heat. Do this for 10-15 seconds or until the tortillas are warm.

4. Put about two tablespoons of veggie mixture on each tortilla. Drizzle with the dijon sauce and top with a sprinkle of cilantro. Lastly, add an avocado to each. Do this for all of the tortillas. Enjoy!

Garlic-y Goodness Hummus

WARNING: Make sure to only eat this hummus with family and friends who won’t judge you for having garlic breath! Or at least make sure that everyone is eating it with you so that everyone has the same garlic breath! 🙂


You will never buy store bought hummus again after making this recipe. Most people don’t even realize that you can make hummus. My friends are always pretty impressed when I make hummus for them because they imagine it to be some extremely strenuous process. Little secret… It’s probably one of the easiest things that you can make. As long as you have a food processor or a blender, you put together home made hummus in a matter of minutes. The awesome part about making your own hummus is that you can make it whatever flavor you want as long as you have the base down. Once you have the basic recipe, you can add sun dried tomatoes, artichoke, cayenne… whatever you feel like. I prefer super garlic-y to keep away the vampires. If you don’t like garlic/want to hang with the twilight folks, just don’t add in the garlic to this recipe!

close up

Garlic Hummus 

serves 6

Ingredients

1 can chickpeas, drained (reserve the liquid)

2 tablespoons tahini

2 garlic cloves

1 teaspoon lemon juice

2 tablespoon olive oil, plus more to drizzle on top

1 teaspoon cumin

1/2 teaspoon salt

a sprinkle of paprika for garnish

1. Combine all of the ingredients (other than the reserved liquid and paprika) into a food processor and blend until smooth. If the consistency isn’t right, add a little bit of the reserved liquid until the hummus is the right texture.

2. Sprinkle the paprika and about 1 teaspoon of olive oil before serving. You can serve hummus with cucumber, carrots, pita, or even pretzels.

***YAY FOR HEALTHY SNACKS!!!***

with carrots